People buy books, clothes, groceries – pretty much anything – sitting on a couch with their smartphones. What could be more convenient? No one will settle for less.
Statista has prepared some staggering numbers to prove that. The part of m-commerce in e-commerce retail is expected to reach 72.9% in 2021 compared to 58.9% in 2017. Such a massive growth took only four years.
The good news for businesses is that the best mobile app payment gateways are easily accessible, and you can pick the fees and features suiting your business model. This is our topic for discussion today.
From this blog post, you’ll learn about the major business benefits of in-app payments, the most popular gateway options, and how to add a payment gateway in your app.
How Does a Payment Gateway Work?
Simply put, payment gateways are mediators between online customers (and their mobile devices) and financial institutions. Without them, in-app purchases would be pretty much impossible.
You’d probably ask, what’s the need for these third-party services? They provide top-notch security to personal financial data and money transfer processes – banks and FIs can’t handle it on their own.
Read also: Latest technology trends in software development
Read more
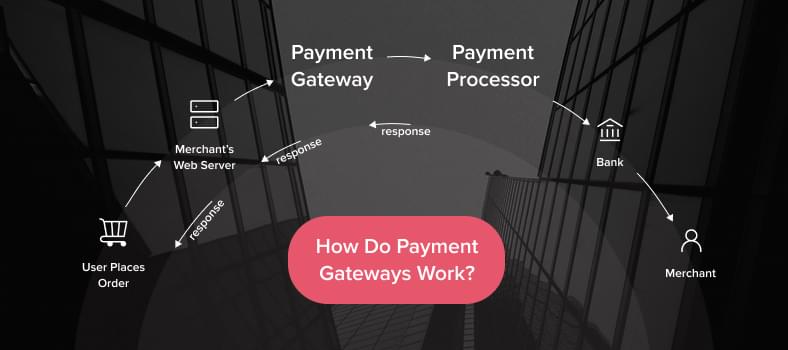
Online payment workflow:
- Users open a cart to buy the items they chose.
- To make a payment, they enter debit or credit card details on the payment page.
- These details are sent to a payment system (gateway). It encrypts user data and passes it to a payment processor.
*The payment processor is another mediator that initiates the transaction process and gets feedback from an acquiring bank (for example, Visa or Mastercard).
- The processor verifies if the data is correct and transmits the information to the bank (financial institution).
- Then, this request should pass verification by the institution (it takes seconds).
- The processor sends the bank feedback to the gateway.
- After approval, the sum is withdrawn from the buyer’s card and sent to the merchant’s account.
Benefits of a Payment Gateway for a Mobile Application
It’s probably clear by now that payment gateways are an essential part of mobile app development. But if you have any hesitations, check out these business advantages.
- Secure payments. Gateways nowadays are the most effective way to protect sensitive data and create the safest payment environment for online shoppers. Also, payment gateways have in-built fraud detection tools for the maximum security level. That said, the right mediator can improve your business reputation among potential customers and significantly extend your user base.
- Business expansion. People around the globe will be able to buy your products – payment gateways remove any borders between your company and a target customer. That’s a splendid opportunity to grow your company with no need for a brick-and-mortar branch.
- Fast transactions. Gateways are the only tools that enable instant payments. Without them, every purchase would take much longer and ruin user experience and engagement. The result of it would be a drop in sales that usually takes time to recover from.
- 24/7 support. Payment gateways guarantee that your online store is open at any time of the day and available from anywhere in the world.
- No need to manage declined transactions. As you’ve seen from the gateway workflow, the transaction is approved or declined in seconds, so there’s no need for managers to control this process. Instead, they can focus on more creative and mind consuming tasks to improve current relations with customers.
5 Best Mobile App Payment Gateways
Now it’s time to see how it works in practice. There are numerous gateways on the market – we use the Forbes Advisor rating to tell you about the best ones.
1. Square
Pricing: from 2.6% + 0.01 USD per transaction.

Key features:
- Payments are accepted online and offline;
- Additional POS and mobile payment hardware available;
- Integration with e-commerce platforms: Wix, WooCommerce, Weebly, and others;
- Several helping features like integration with CRM software, schedule management, payroll emission, etc.;
- Square Invoice is a tool for billing from any device to the customer’s email.
2. Payment Depot
Pricing: monthly fee (from 79 USD up to 199 USD) and per-transaction charge (from 0.07 USD up to 0.15 USD).

Key features:
- Breach protection;
- POS hardware options for different pricing plans;
- Free set-up of existing POS terminals;
- Services of a dedicated account manager as a part of the advanced pricing plan;
- Available only for the US market.
3. Stripe
Pricing: 2.9% + 0.03 USD per transaction.

Key features:
- Tools to optimize checkout (for example, UI toolkit and PCI compliance);
- 135+ currencies supported globally;
- Robust reporting;
- Managing disputes programmatically;
- Unified dashboard, plus iOS and Android dashboard apps for quicker access;
- 450+ third-party integrations.
4. Helcim
Pricing: from 0.1% + 0.05 USD per transaction.

Key features:
- Several hardware options for offline payments (mobile card readers, Bluetooth terminals, chip card readers, etc.);
- iOS and Android apps to process payments from mobile card readers;
- Customizable invoicing and payment request options;
- ACH bank transfer processing (US) and ETF/PAD processing (Canada);
- Self-service customer portal.
5. Stax
Pricing: from 99 USD monthly.

Key features:
- Invoice issued via SMS or email, plus automatic reminders;
- Dashboards and analytics reporting;
- User management: customer health monitoring and transaction history review;
- Surcharging;
- Individual branding for online payment pages, invoices, and terminals;
- Same-day funding.
How to Choose the Right Payment Gateway for Your App
The number of payment gateways continues to grow, and choosing perfect technologies for your business could be challenging. For you not to get overwhelmed with market offerings, we’ve prepared a list of priorities to focus on.
1. Make sure the gateway supports your product.
Many providers support both digital and physical products, but not all of them. Plus, providers consider some product groups riskier and don’t work with them whatsoever.
Read also: How to build a payment app for money transfer
Read more
For example, Stripe has a detailed explanation on “Restricted Businesses”. They include investment and credit services, gambling, adult content and services, get-rich-quick schemes, and many other categories.
Before moving any further, you should be sure you’re on the“white list” of a particular provider.
2. Pay attention to pricing.
After our market overview, you’ve noticed how prices for gateway services may differ. It’s crucial not to overlook hidden spending traps, so keep in mind these fee types:
- gateway setup,
- merchant account setup,
- monthly fee, and
- per-transaction fee.
Look through gateway documentation to ensure there are no fee surprises for you and the pricing policy is crystal clear.
Besides, picking a monthly fee is not the best idea for small businesses that don’t have a high turnover level. On the contrary, it could be beneficial for bigger enterprises.
3. Check payment methods and card types.
In 2020, digital wallets were the most popular payment method for online shopping. Credit and debit cards are in second and third place respectively. You should list payment tools and services used by your target audience and ensure that a payment gateway of your choice supports them all.
Integrating digital wallet payments differs from payment card support because they have different tokenization processes. You should check if a payment gateway allows using mobile wallets.
How to solve UI challenges in iOS security
Read more
Another essential point is multi-currency payments. If your goal is the international market, check this option and its cost for businesses – some gateways require additional fees for multi-currency support.
4. Study transaction limits.
As any other business owner, you want to use one payment gateway option for the whole business, but it depends on the gateway capabilities.
The thing is, gateways often have limitations for the minimum and maximum sums of transactions. For instance, Square’s maximum transaction is 50 000 USD. This sum is enough for most businesses but not necessarily in your case.
5. Look closely at merchant account options.
Lots of gateway providers contain merchant account options as well –it’s way more convenient for business owners. A merchant account is where payments from customers go before you get them, a kind of money storage.
Why does this layer even exist? Basically, it’s for a smooth shopping experience. Some buyers want to return what they bought or get a refund. Such issues can be managed with the money accumulated in your merchant account.
Here are two types of merchant accounts to consider:
- A dedicated account is for your business only. It gives you more control over your money and operations. Companies with dedicated accounts usually obtain faster transactions, but you should also be ready to pay a higher price for this account type.
- An aggregated account is for several merchants (businesses). In most cases, entrepreneurs pick this option as it’s cheaper, easier to set up (takes less than 24 hours), and requires less Know Your Customer data.
Tips for Integrating Payment Gateway into an Android App (Stripe Tutorial)
CHI Software developers in both iOS and Android departments recommend Stripe as the best option for mobile applications with a payment gateway.
This simple instruction will give you a general understanding of how to add a payment gateway in Android apps on the front-end (client-side). For more details, visit this Stripe tutorial.
1. Installing Stripe SDK.
Add stripe-android to dependencies of the app/build.gradle file:
apply plugin: 'com.android.application'

android { ... }

dependencies {
  // ...

  // Stripe Android SDK
  implementation 'com.stripe:stripe-android:18.2.0'
}
2. Configuring the SDK with a publishable key.
With a publishable key, Stripe SDK will be able to make requests to Stripe API:
import com.stripe.android.PaymentConfiguration

class MyApp : Application() {
    override fun onCreate() {
        super.onCreate()
        PaymentConfiguration.init(
            applicationContext,
            "pk_test_TYooMQauvdEDq54NiTphI7jx"
        )
    }
}
3. Setting up an ephemeral key.
After an ephemeral key is added on the back-end, the client side should communicate with it. Create a provider class for the ephemeral key:
class ExampleEphemeralKeyProvider : EphemeralKeyProvider {

    private val compositeDisposable: CompositeDisposable = CompositeDisposable()
    private val backendApi: BackendApi =
            RetrofitFactory.instance.create(BackendApi::class.java)

    override fun createEphemeralKey(
        @Size(min = 4) apiVersion: String,
        keyUpdateListener: EphemeralKeyUpdateListener
    ) {
        compositeDisposable.add(
            backendApi.createEphemeralKey(hashMapOf("api_version" to apiVersion))
                .subscribeOn(Schedulers.io())
                .observeOn(AndroidSchedulers.mainThread())
                .subscribe { responseBody ->
                    try {
                        val ephemeralKeyJson = responseBody.string()
                        keyUpdateListener.onKeyUpdate(ephemeralKeyJson)
                    } catch (e: IOException) {
                        keyUpdateListener
                            .onKeyUpdateFailure(0, e.message ?: "")
                    }
                })
    }
}
4. Setting up a CustomerSession.
A CustomerSession connects with the app’s back-end and gets an ephemeral key for the customer using the generated EphemeralKeyProvider:
class StoreActivity : Activity() {
    override fun onCreate(savedInstanceState: Bundle?) {
        super.onCreate(savedInstanceState)
        CustomerSession.initCustomerSession(this, ExampleEphemeralKeyProvider())
    }
}
5. Setting up a PaymentSession.
Here comes the main part of the integration – the PaymentSession class. It uses the CustomerSession to store and collect transaction and shipping data. This part consists of several steps:
5.1. Creating the PaymentSessionConfig:
private fun paymentSessionConfig(): PaymentSessionConfig {
        return PaymentSessionConfig.Builder()
                .setShippingInfoRequired(false)
                .setShippingMethodsRequired(false)
                .setPaymentMethodTypes(
                        listOf(PaymentMethod.Type.Card)
                )
                .setShouldShowGooglePay(true)
                .build()
    }
5.2. Configuring PaymentSessionListener:
private fun createPaymentSessionListener(): PaymentSession.PaymentSessionListener {
        return object : PaymentSession.PaymentSessionListener {
            override fun onCommunicatingStateChanged(isCommunicating: Boolean) {
                if (isCommunicating) {
                    // update UI to indicate that network communication is in progress
                } else {
                    // update UI to indicate that network communication has completed
                }
            }

            override fun onError(errorCode: Int, errorMessage: String) {}

            // Called whenever the PaymentSession's data changes,
            // e.g. when the user selects a new `PaymentMethod` or enters shipping info.
            override fun onPaymentSessionDataChanged(data: PaymentSessionData) {
                if (data.useGooglePay) {
                   // customer intends to pay with Google Pay
                } else {
                    data.paymentMethod?.let { paymentMethod ->
                        // Display information about the selected payment method
                    }
                }

                // Update your UI here with other data
                if (data.isPaymentReadyToCharge) {
                    // Use the data to complete your charge - see below.
                }
            }
        }
    }
5.3. Starting the PaymentSession in the PaymentFragment:
// add variables declarations
    private var stripe: Stripe? = null
    private var paymentSession: PaymentSession? = null

    override fun onViewCreated(view: View, savedInstanceState: Bundle?) {

        CustomerSession.initCustomerSession(requireContext(), ExampleEphemeralKeyProvider(apiRetrofit))

        // add following lines
        paymentSession = PaymentSession(this, paymentSessionConfig())
        paymentSession?.init(createPaymentSessionListener())
    }
5.4. As the last step, adding payment session handler:
override fun onActivityResult(requestCode: Int, resultCode: Int, data: Intent?) {
        super.onActivityResult(requestCode, resultCode, data)

        // add following line
        paymentSession?.handlePaymentData(requestCode, resultCode, data ?: Intent())

    }
6. Starting the payment.
You need to get stripeAccountId and clientSecret from the back-end.
7. Adding a payment method.
To add a method, call this code:
paymentSession?.presentPaymentMethodSelection()
It will go to PaymentMethodsActivity:
8. Confirming a payment.
Add a payment button to call the payment method:
override fun pay(stripeAccountId: String, clientSecret: String) {
        stripe = Stripe(requireContext(), PaymentConfiguration.getInstance(requireContext()).publishableKey, stripeAccountId)
        stripe?.confirmPayment(
                this,
                ConfirmPaymentIntentParams.create(clientSecret),
                stripeAccountId
        )
    }
9. Adding the PaymentListener.
The PaymentListener is added to onActivityResult:
override fun onActivityResult(requestCode: Int, resultCode: Int, data: Intent?) {
        super.onActivityResult(requestCode, resultCode, data)
        paymentSession?.handlePaymentData(requestCode, resultCode, data ?: Intent())

        // add following lines
        stripe?.onPaymentResult(requestCode, data, object : ApiResultCallback {
            override fun onSuccess(result: PaymentIntentResult) {
                val paymentIntent = result.intent
                val status = paymentIntent.status
                if (status == StripeIntent.Status.Succeeded) {

                } else if (status == StripeIntent.Status.RequiresPaymentMethod) {

                }
            }

            override fun onError(e: Exception) {
            }
        })

    }
After implementation, developers should collaborate with testers to check various payment scenarios for card operations, bank redirects, and bank debits.
Stripe also provides instructions for:
- Enabling Google Pay,
- Customizing the sheet, and
- Completing payments in your UI.
Tips for Integrating Payment Gateway into an iOS App (Stripe Tutorial)
Stripe gateway provides an intuitive and developer-friendly environment that makes it a go-to payment option for an iPhone app.
In this section, we’ll review iOS app payment gateway integration on the frontend (client-side). For more details and clarification, including backend (server-side) workflow, visit this official Stripe tutorial.
1. Installing Stripe SDK.
Keep in mind that Stripe iOS SDK supports apps updated to the iOS 11 version or above.
iOS tools for installing Stripe SDK include Swift Package Manager, CocoaPods, Carthage, and Dynamic Framework. In case of Swift Package Manager, follow this workflow:
Open Xcode and go to File>Swift Packages>Add Package Dependency. There, enter https://github.com/stripe/stripe-ios and pick one of the latest versions.
*As of November 2021, a minimum version should be 21.9.0.
CHI Software developers use CocoaPods most often, so here’s an instruction for it as well:
1.1. Create a Podfile and add this line to it:
pod 'Stripe'
1.2. Run the command for installation:
pod install
1.3. Note that you should use .xcworkspace to open the project in Xcode from now on.
1.4. To update SDK to the latest version, run this:
pod update Stripe
2. Choosing payment methods.
In the account, developers can check their payment methods settings and pick the options necessary for their application.
Note that card payments are set up by default, so if it’s the only option, this step can be skipped.
3. Collecting payment details.
At this stage, you have several elements on the back-end:
- the PaymentIntent client secret,
- Ephemeral Key secret,
- Customer ID, and
- A publishable key.
On the frontend, developers should fetch all these, setting their publishable key with StripeAPI.shared and initializing PaymentSheet (for UIKit):
import UIKit
import Stripe

class CheckoutViewController: UIViewController {
  @IBOutlet weak var checkoutButton: UIButton!
  var paymentSheet: PaymentSheet?
  let backendCheckoutUrl = URL(string: "Your backend endpoint")! // Your backend endpoint

  override func viewDidLoad() {
    super.viewDidLoad()

    checkoutButton.addTarget(self, action: #selector(didTapCheckoutButton), for: .touchUpInside)
    checkoutButton.isEnabled = false

    // MARK: Fetch the PaymentIntent client secret, Ephemeral Key secret, Customer ID, and publishable key
    var request = URLRequest(url: backendCheckoutUrl)
    request.httpMethod = "POST"
    let task = URLSession.shared.dataTask(with: request, completionHandler: { [weak self] (data, response, error) in
      guard let data = data,
            let json = try? JSONSerialization.jsonObject(with: data, options: []) as? [String : Any],
            let customerId = json["customer"] as? String,
            let customerEphemeralKeySecret = json["ephemeralKey"] as? String,
            let paymentIntentClientSecret = json["paymentIntent"] as? String,
            let publishableKey = json["publishableKey"] as? String,
            let self = self else {
        // Handle error
        return
      }

      STPAPIClient.shared.publishableKey = publishableKey
      // MARK: Create a PaymentSheet instance
      var configuration = PaymentSheet.Configuration()
      configuration.merchantDisplayName = "Example, Inc."
      configuration.customer = .init(id: customerId, ephemeralKeySecret: customerEphemeralKeySecret)
      // Set `allowsDelayedPaymentMethods` to true if your business can handle payment
      // methods that complete payment after a delay, like SEPA Debit and Sofort.
      configuration.allowsDelayedPaymentMethods = true
      self.paymentSheet = PaymentSheet(paymentIntentClientSecret: paymentIntentClientSecret, configuration: configuration)

      DispatchQueue.main.async {
        self.checkoutButton.isEnabled = true
      }
    })
    task.resume()
  }

}
Afterwards, the flow should be like this:
- The customer taps the Checkout button > the developer calls present to display the payment sheet;
- When the customer completes their payment, the sheet should be dismissed > the developer calls the completion block using PaymentSheetResult.
@objc
func didTapCheckoutButton() {
  // MARK: Start the checkout process
  paymentSheet?.present(from: self) { paymentResult in
    // MARK: Handle the payment result
    switch paymentResult {
    case .completed:
      print("Your order is confirmed")
    case .canceled:
      print("Canceled!")
    case .failed(let error):
      print("Payment failed: \(error)")
    }
  }
}
4. Setting up a return URL.
This is an optional step to improve user experience. If the customer leaves your app and goes to Safari or their banking app for authentication, they should be automatically redirected back to your application.
In this case, a developer should configure a URL scheme (or a universal link):
// This method handles opening custom URL schemes (e.g., "your-app://")
func application(_ app: UIApplication, open url: URL, options: [UIApplication.OpenURLOptionsKey: Any] = [:]) -> Bool {
    let stripeHandled = StripeAPI.handleURLCallback(with: url)
    if (stripeHandled) {
        return true
    } else {
        // This was not a Stripe url – handle the URL normally as you would
    }
    return false
}

// This method handles opening universal link URLs (e.g., "https://example.com/stripe_ios_callback")
func application(_ application: UIApplication, continue userActivity: NSUserActivity, restorationHandler: @escaping ([UIUserActivityRestoring]?) -> Void) -> Bool  {
    if userActivity.activityType == NSUserActivityTypeBrowsingWeb {
        if let url = userActivity.webpageURL {
            let stripeHandled = StripeAPI.handleURLCallback(with: url)
            if (stripeHandled) {
                return true
            } else {
                // This was not a Stripe url – handle the URL normally as you would
            }
        }
    }
    return false
}
Also, the returnURL should be set on PaymentSheet.Configuration to the app’s URL:
var configuration = PaymentSheet.Configuration()
configuration.returnURL = "your-app://"
After implementation, developers should collaborate with testers to check various payment scenarios, which include card operations, bank redirects, and bank debits.
To add, Stripe provides instructions for:
- Enabling Apple Pay,
- Enabling card scanning,
- Customizing the sheet, and
- Completing payments in your UI.
How Much Does It Cost to Add a Payment Gateway in Your App?
Mind that payment gateway integration consists of several types of work:
- The development itself (frontend + backend): 50 hours;
- Testing: 20 hours;
- Support: 5-10 hours monthly.
These are the figures for one platform only– either iOS or Android. If you’ve already found a software development company, you can quickly calculate the cost based on their rates. If you’re now searching for a perfect team, here are approximate developers’ rates globally:
Based on these figures, payment gateway integration with testing (70 hours) will cost you 3 500 USD-14 000 USD, depending on the vendor’s location.
When picking a software team, make sure to ask the following questions:
- Do you have proven experience in payment gateway integration for iOS or Android apps?
- Describe the results of these projects and how you support them now.
- What payment gateway would you recommend for my app, and why this one exactly?
This is the starting point of your successful collaboration. Don’t hesitate to ask for detailed case studies, describing tech stacks and development approaches.
CHI Software Experience in iOS and Android App Payment Gateway Integration
Payment gateway integration is a vital feature of numerous mobile apps, and our development projects are not an exception. Here’s one of the examples (read more details on our website).
Our client: an international telecommunication company and one of the largest mobile operators in the world headquartered in London.
Business needs: our client has to handle thousands of financial operations every day, so the company needed an effective solution to manage it all within one mobile app.
Solution: Our team developed both iOS and Android applications enabling users to conduct fast payments and money transfers. Now users can:
- Pay for mobile, Internet, TV, transportation, utilities, and other services;
- Transfer money in several ways: via a mobile phone account, wallet account, and card of any bank;
- Create and regularly use payment templates;
- Create invoices and their templates.
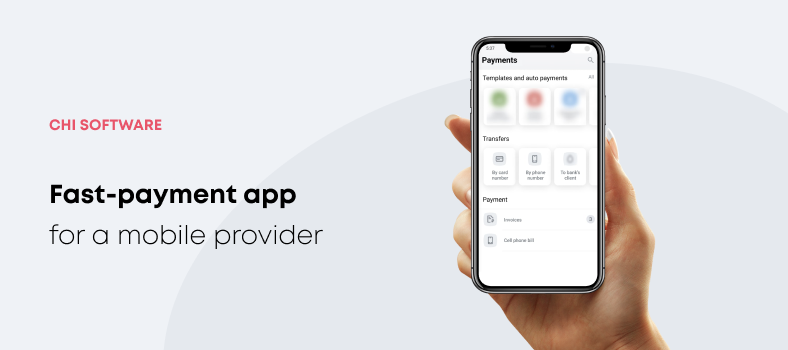
One of the priority tasks was to build up a secure environment for money transactions regardless of the payment type.
Now, our client’s customers benefit from one of the most convenient instruments for money transfers with numerous payment options. It has improved customer experience and strengthened the market position for our client.
Conclusion
Nowadays, you won’t surprise anyone with online shopping. On the contrary, it has become a vital necessity in the pandemic era. What can you do as a business owner? Make shopping as convenient as possible by offering fast mobile payments.
- Payment gateways are the only mediators between banks and shoppers that can ensure secure transactions;
- Apart from security, payment gateways provide businesses with more expansion opportunities, faster payment processes, and 24/7 support;
- According to Forbes Advisor, the top five payment gateways are Square, Payment Depot, Stripe, Helcim, and Stax;
- CHI Software developers find Stripe the most efficient provider with easy installation;
- No matter what the trends are, a payment gateway should suit your business niche, needs, and location;
- It takes 50 hours to integrate a payment gateway into a mobile application, plus 20 hours for testing;
- In this article, we’ve also reviewed the process of iOS and Android app payment integration from the developer’s perspective.
About the author
Polina is a curious writer who strongly believes in the power of quality content. She loves telling stories about trending innovations and making them understandable for the reader. Her favorite subjects include AI, AR, VR, IoT, design, and management.
Rate this article
22 ratings, average: 4.5 out of 5