If you are hunting for the ultimate way to earn money on the App Store, look no further. Why? This article will tell you all the benefits of in-app purchases on iOS and provide insights.
According to forecasts, by 2027, global app store revenues will reach USD 125 billion for the Apple App Store (AS) and USD 60 billion for Google Play (GP). It would be a shame not to grab a piece of that pie.
The most reliable way to do that is to set up StoreKit for in-app purchases, whether you are using the original version or the updated one. And our article is just about that. Here, we gathered a pinch of theory and helpful tips to make in-app purchases work. Let us do it!
In-App Purchases: What Are They?
In-app purchases are extra features, content, and other cool stuff users can buy inside your app. You probably made in-app purchases yourself, right? It is a popular way to make money in the mobile app industry.
In-app purchases can take many forms but work similarly on the back-end.
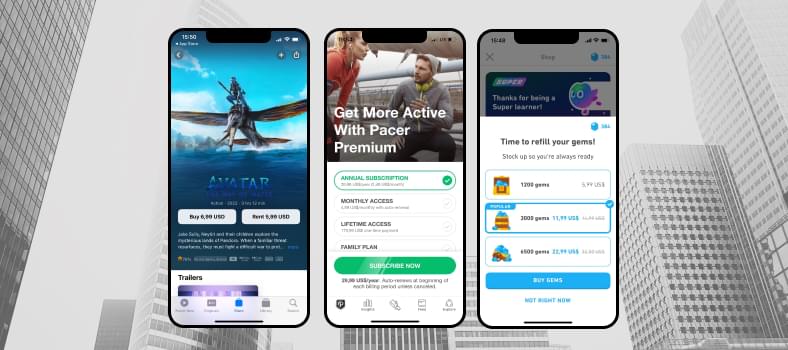
App examples: Apple TV, Pacer, and Duolingo
Apple offers four types of in-app purchases:
- Consumable purchases are one-time items that disappear once you use them up. Think virtual coins, extra moves in a game, or additional time to perform a task in a language learning app. Once you have used a consumable purchase, you buy it again if you want more. It is like a refillable treat;
- Non-consumable purchases are items that stay with you forever, like a skin for a game character or lifetime access to premium functionality in a fitness tracker;
- Auto-renewable subscriptions provide ongoing access to an app’s content, services, or premium features. Users are billed over and over again until they cancel or payment issues occur. Common use cases include access to video and music libraries, media, educational resources, software as a service, and many more;
- Non-renewable subscriptions give access to content, services, or premium features for a set period of time. For example, seasonal access to in-game content or renting a movie in a streaming app.
How Do iOS In-App Purchases Work?
The purchase workflow in iOS typically involves four parties: an app, an app server, the App Store, and the StoreKit framework.
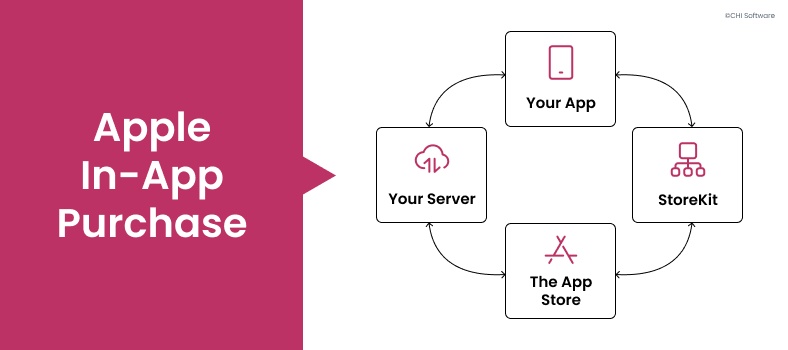
This is a rough representation of Apple’s in-app purchases.
Let us dive into how these elements work together:
- App & StoreKit: An app uses StoreKit to request product information from the App Store. StoreKit presents the product to the user and communicates with the App Store for a purchase transaction;
- App & Server: After a successful purchase, an app sends purchase data to a server for receipt validation. A server communicates with Apple’s servers using Apple’s receipt validation API to prove the receipt is legit. A server responds to an app to confirm the receipt’s validity;
Here is our guide on test-driven development for iOS
Read more
- Server & App Store: During receipt validation, a server communicates directly with the App Store servers to verify a purchase receipt. The App Store servers respond to the server’s validation request with information about the receipt’s validity and a purchased product;
- App Store & StoreKit: StoreKit communicates with the App Store to initiate a purchase transaction, manage payment processing and a transaction lifecycle, restore purchases, check the status of auto-renewable subscriptions, and handle subscription renewals.
What Is StoreKit?
Let us talk in detail about StoreKit, a framework supporting purchases across all Apple platforms. The first version of StoreKit appeared in OS 3.0 in 2009, enabling many new features:
- In-app purchases: Offering and promoting in-app purchases of content and services;
- App transactions: Purchase verification with an App Store-signed transaction;
- Ad network attribution: Validating app installations driven by advertisement;
- Recommendations: Providing recommendations of third-party content;
- Reviews: Requests for App Store reviews and ratings from app users;
- Messaging: Displaying App Store messages within apps.
Despite a great feature set, StoreKit has significant drawbacks for developers and users, such as:
- Framework complexity: StoreKit is difficult to understand and requires a lot of additional infrastructure for smooth operation;
- No purchase validation: StoreKit does not provide built-in receipt validation, so developers need to take an extra step to implement it separately on their servers;
- Limited subscription management: StoreKit subscriptions don’t have tools to manage free trial time, other introductory offers, and grace periods. This can be a headache for developers managing complex subscription models;
- Complex synchronization across devices: StoreKit lacks built-in mechanisms for smooth automatic syncing of in-app purchases and subscription details across devices sharing the same Apple ID account.
Learn how to set up App Clips in your iOS app
Read more
StoreKit 2: What Is New?
In 2021, Apple introduced StoreKit 2, significantly simplifying in-app purchase integration. So, what has changed?
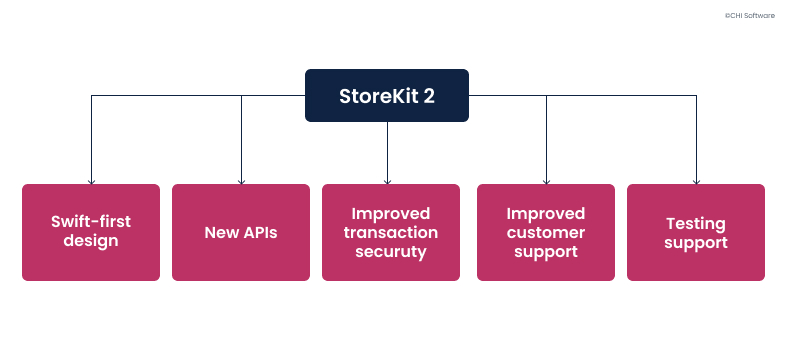
How StoreKit 2 differs from the first version.
Swift-First Design
StoreKit 2 takes all the advantages of the latest Swift features to simplify management during in-app purchase on iOS, for example, Swift concurrency.
New APIs
New Swift-based APIs ensure we get all the latest information on products, purchases, transactions, history of transactions, and subscription statuses.
Improved Transaction Security and Simplicity
StoreKit 2 uses the App Store cryptographic signature in JSON Web Signature format to strengthen security and privacy. Integration with Touch ID and Face ID has made user-authorized transactions smooth and convenient.
Improved Customer Support
StoreKit 2 simplifies numerous processes, including subscription management, refund requests, and confirming purchase details during customer support calls.
Testing Support
StoreKit 2 enables testing an app in XCode and the App Store sandbox environment to ensure that new functionality works properly, including monetizing apps with StoreKit.
StoreKit 2 is available on iOS 13+, macOS 10.15+, tvOS 13+, and watchOS 6+, while StoreKit is still used for older OS versions.
In-App Purchases with StoreKit 2: Practical Tips
To explore in-app purchases with StoreKit more profoundly, you can find a comprehensive documentation set here. And now, let us jump right into the practice.
Fetching products
Before a user can make a purchase, in-app products must be fetched from StoreKit. We asynchronously fetch product data using a set of product identifiers:
typealias ProductId = String

let productIds: Set<ProductId>

func fetchProducts() async throws -> [Product] {
    let storeProducts = try await Product.products(for: productIds)

    return storeProducts
}
The following example illustrates calling products(for:) on the Product type and filtering by the fetched products:
@MainActor func requestProducts() async {
    do {
        let storeProducts = try await Product.products(for: productIds)

        for product in storeProducts {
            switch product.type {
            case .consumable: break
            case .nonConsumable:break
            case .autoRenewable:break
            case .nonRenewable:break
            default:
                print("Unknown product")
            }
        }
    } catch {
        print("Failed product request from the App Store server: \(error)")
    }
}
Making a Purchase
Once we fetched our product from StoreKit, we call a method that initiates a purchase:
func purchase(_ product: Product) async throws -> Transaction {

    let result = try await product.purchase()
}
We can apply several options to purchases: setting a token, quantity, offers, codes, etc. Let us look closer at some of them.
- appAccountToken(_:) sets a universally unique identifier (UUID) and, in that way, enables associating a purchase with a registered account in our system.
public static func appAccountToken(_ token: UUID) -> Product.PurchaseOption
Example:
let result = try await product.purchase(options: [.appAccountToken(UUID())])
- quantity(_:) indicates the number of purchased items. The quantity option is applied only to consumable products and non-renewable subscriptions. If the option is not applied, the default quantity is 1.
public static func quantity(_ quantity: Int) -> Product.PurchaseOption
Example:
let result = try await product.purchase(options: [.quantity(5)])
- Custom purchase options allow adding specific conditions with string-formatted keys and values in data, numbers, strings, or boolean formats.
public static func custom(key: Key, value: Value) -> Product.PurchaseOption
Example:
typealias Key = String
typealias Value = String

let result = try await product.purchase(options: [.custom(key: Key, value: Value)])
Product.PurchaseResult
The value of the purchase result describes the state of the purchase process. It can be successful, canceled, or pending.
public enum PurchaseResult {

    /// The purchase succeeded with a `Transaction`.
    case success(VerificationResult<Transaction>)

    /// The user canceled the purchase.
    case userCancelled

    /// The purchase is pending some user action.
    ///
    /// These purchases may succeed in the future, and the resulting `Transaction` will be
    /// delivered via `Transaction.updates`
    case pending
}
When the operation is successful, the value contains the transaction’s VerificationResult.
VerificationResult
VerificationResult represents a result of the StoreKit verification.
enum VerificationResult<SignedType> {

    /// The associated value failed verification for the provided reason.
    case unverified(SignedType, VerificationResult<SignedType>.VerificationError)

    /// The associated value passed all automatic verification checks.
    case verified(SignedType)
}
The example illustrates calling purchase(options:) on a Product value, checking a purchase status, and inspecting the transaction’s success.
let result = try await product.purchase()

switch result {
case .success(let verificationResult):
    switch verificationResult {
    case .verified(let transaction):
        // Give the user access to purchased content.
        ...
        // Complete the transaction after providing
        // the user access to the content.
        await transaction.finish()
    case .unverified(let transaction, let verificationError):
        // Handle unverified transactions based
        // on your business model.
        ...
    }
case .pending:
    // The purchase requires action from the customer.
    // If the transaction completes,
    // it's available through Transaction.updates.
    break
case .userCancelled:
    // The user canceled the purchase.
    break
@unknown default:
    break
}
TransactionListener
Once a transaction is pending, it usually takes several hours or even days to transfer it to a success or failure state. Because of this, the application needs a TransactionListener to track transaction status changes and update its internal state accordingly.
The following code lets you stay informed about new purchases, check their validity, hand over purchases to a user, and deal with situations when verification fails.
Tip: Remember to call transaction.finish(). Otherwise, updates will keep being received by the TransactionListener every time the app starts.
func listenForTransactions() -> Task<Void, Error> {
    return Task.detached {
        //Iterate through any transactions that do not come from a direct call to `purchase()`.
        for await result in Transaction.updates {
            do {
                let transaction = try self.checkVerified(result)

                //Deliver products to the user.
                await self.updateCustomerProductStatus()

                //Always finish a transaction.
                await transaction.finish()
            } catch {
                //StoreKit has a transaction that fails verification. Do not deliver content to the user.
                print("Transaction failed verification")
            }
        }
    }
}
Since the TransactionListener sequence keeps running indefinitely, it can block the main thread. To avoid it, we make the sequence a detached task to run independently from the main thread. We store a reference early in the app’s lifecycle and use it later to cancel when needed:
var updateListenerTask: Task<Void, Error>? = nil
After calling the function, we can react to any transaction update:
private func startStoreKitListener() {
    updateListenerTask = listenForTransactions()
}
Managing User Access to Premium Features
StoreKit2 enables fast and convenient user access to paid features with the new API available in Transaction. To implement it, we use Transaction.currentEntitlements, an asynchronous sequence returning all transactions that give users access to a product or feature.
@MainActor
func updatePurchases() {
    async {
        for await result in Transaction.currentEntitlements {
            guard case .verified(let transaction) = result else { continue }
            //check smth
        }
    }
}
Offering In-App Refunds
StoreKit 2 functionality allows you to send a refund from the app. Here is how you can do it:
@MainActor
func beginRefundProcess(for productID: String) {
    guard let scene = view.window?.windowScene else { return }

    async {
        guard case .verified(let transaction) = await Transaction.latest(for: productID) else { return }

        do {
            let status = try await transaction.beginRefundRequest(in: view.window!.windowScene!)

            switch status {
            case .userCancelled:
                break
            case .success:
                // Maybe show something in the UI indicating that the refund is processing
                setRefundingStatus(on: productID)
            @unknown default:
                assertionFailure("Unexpected status")
                break
            }
        } catch {
            print("Refund request failed to start: \(error)")
        }
    }
}
Bringing It Together
In-app purchases with StoreKit 2 opens up a world of revenue-generating possibilities within existing software. In the article, we have highlighted the basics, but there are many more insights and tips that our mobile engineers are excited to share.
If iOS app monetization keeps you up at night, contact CHI Software’s mobile department. Nearly 60 developers are up for tackling any challenges and ready to help you get that competitive edge everyone is talking about.
About the author
With 5 fabulous years under his belt, Artem is an iOS developer with experience in everything from healthcare and social apps to food & booking platforms and even entertainment. He's a wizard at crafting apps that are not just easy to use but totally engaging. Whether Artem's building an app from square one or stepping in mid-project, he's a go-to expert for making digital magic happen.
Rate this article
25 ratings, average: 4.52 out of 5